
1 Introduction
SZTPD is an implementation of a “bootstrap server”, as defined in the Terminology section of RFC 8572, also known as an “SZTP server”, as defined in the Terminology section of draft-kwatsen-netconf-sztp- csr".
SZTPD is provided as software, an asynchronous event-driven Python-based executable. SZTPD is an application (not a library) that includes a northbound API for configuration, a southbound API for device bootstrapping requests, and eastbound hooks for integration with other business systems.
This documentation is in preparation for a “1.0.0” release, using the common “major.minor.patch” semantic versioning convention.
2 Installation
SZTPD is installed using the command:
$ pip install sztpdor, if Python 3 is installed separately:
$ pip3 install sztpdOn some systems it may be necessary to install the sqlite package first (e.g., yum install sqlite).
2.1 Machine Resources
SZTPD has resource requirements as described in the following sections.
2.1.1 Processors
SZTPD runs as a single asynchronous I/O event driven process. It is ideal to dedicate a whole core to the sztpd process, thus, in addition to the operating system, the machine should have at least two processors.
2.1.2 Memory
SZTPD uses significant memory resources1. The following sections consider SZTPD’s constant and transitive memory demands.
2.1.2.1 Constant Memory Demand
SZTPD has a constant memory demand that grows in proportion to its configuration (minus all large base64 blobs stored in the configuration). Sizing numbers for this haven’t been measured yet.
2.1.2.2 Transitive Memory Demand
SZTPD has transitive memory demands when processing requests from clients. The highest memory-impacting request is a “PUT” request used to replace the entire SZTPD configuration. In this case, the transitive memory demand is proportional to the sum of the old and new configuration sizes. Sizing numbers for this haven’t been measured yet.
2.1.3 Filesystem
Unless SZTPD is configured to use a file-based database, SZTPD has effectively no interaction with the filesystem, all configuration and logs are stored in the database.
That said, a filesystem must exist if the connection to the database is to be encrypted, as the requisit certificates are passed into the SZTPD executable as command line parameters as file paths. Additionally, it is expected that SZTPD’s stdout/stderr will be piped to a file (e.g., /var/log/sztpd.log).
When using a file-based database, the database file grows proportionally to the size of the configuration plus operational state (e.g., audit logs, bootstrapping logs, etc.). Sizing numbers for this haven’t been measured yet.
2.1.4 Network Interfaces
SZTPD’s networking demands vary by interface, as different APIs are presented for northbound administrators and southbound devices.
While the Northbound API is exclusively a programmatic interface, it is expected to be used to drive human-facing interfaces and thus the speed of the network interface may matter.
The Southbound API is used exclusively for machine-to-machine interactions (i.e., SZTPD and the bootstrapping devices), and thus the speed of the network interface need only be fast enough to not cause timeouts. That said, the devices access the southbound interface when they are bootstrapping, which typically occurs immediately when being powered-up for the first time, which typically entails a human (the installer) manually plugging in a power cable. In some use cases, the installer will be instructed to wait for the device to provide some indication that the bootstrapping process has completed (e.g., an LED pattern, audible sound, etc.). From this perspective only, the speed of the network interface may matter2.
2.2 Operating System
SZTPD is offered as software that depends on Python 3.7 or above. Any operating system that supports Python 3.7 or above should be able to run SZTPD.
Regardless the operating system selected3, standard hardening guidelines should be observed (e.g., disable unnecessary processes, especially those that open listening ports of their own.
2.3 Networking
SZTPD’s networking demands are described in the following two sections. The first section regards the networking needs for inbound connections. The second section regards the networking needs for outbound connections.
2.3.1 Listening Ports and the APIs They Present

SZTPD can listen to a multiplicity of ports and, for each such interface, can present a multiplicity of its APIs. Each port may be bound to a source address and/or source port, enabling integration into virtual network interfaces presented by the host operating system.
The protocol running on each port can be configured to be “HTTP” or “HTTPS”.
If a port is configured to use “HTTP”, it is only intended so that the TLS termination can be offloaded to a device fronting SZTPD (e.g., a firewall). That said, SZTPD cannot know or enforce that TLS was performed, so care must be taken to not accidentally expose an unprotected port to a untrusted network.
When “HTTP” is used, SZTPD may be configured with information about the external endpoint so that, e.g., when SZTPD sends callback information to remote peers (e.g., links in account activation emails), it can address the callback to the external endpoint instead of its local endpoint.
The APIs that may be selected for each listening port are:
2.3.1.1 The Native Interface
The native interface presents an [Northbound Interface] API that can configure everything and anything that can be configured.
Based on the product mode, the API this interface presents varies slightly, as described in Prompting for Desired Mode Selection.
There must always be at least one “native-interface” configured.
2.3.1.2 The Tenant Interface
For deployments using the mode ‘x’ product mode, the tenant interface presents a isolated view of each tenant’s data. No tenant is aware of the existance of any other tenant, nor has access to any other tenant’s data.
For deployments using the mode ‘x’ product mode, SZTPD offers an additional API for subtenant access.
The tenant interface presents an API that is almost exactly like mode-1’s “native” view.
2.3.1.3 The RFC 8572 Interface
The RFC 8752 selection presents the bootstrap server API defined in Section 7 of RFC 8572.
This interface does not provide any access other than as described in RFC 8572.
2.3.2 Variations in Listening Ports
While the above suggests numerous possible combinations, some common options include:
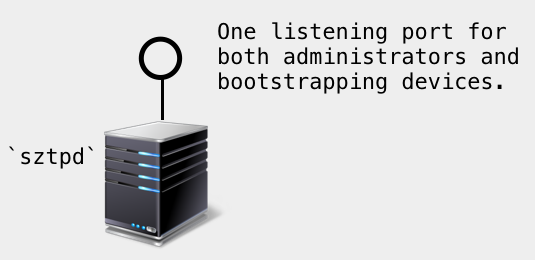
2.3.2.1 One Listening Port
While SZTPD having a single listening port is theoretically useful in production environments, it is unlikely for the reasons mentioned in the next section4.
That said, SZTPD’s default configuration opens a single listening port through which all configuration begins.
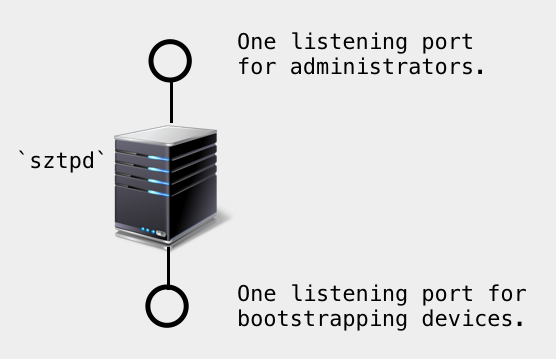
2.3.2.2 Two Listening Ports
SZTPD having two listening ports is suitable when it is desired to isolate the network traffic for administrators and bootstrapping devices. Each port may5 have a unique TLS-level end-entity certificate. Notably, when the SZTPD instance is intended to be a “trusted” (as defined in RFC 8572) bootstrap server, this enables the southbound interface to present a device-friendly6 certificate while the northbound interface presents an administrator-friendly7 certificate.
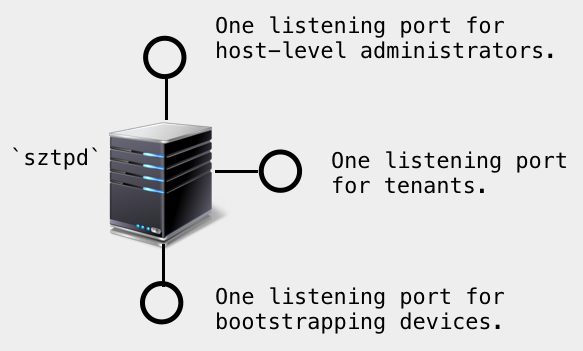
2.3.2.3 Three Listening Ports
SZTPD having a third listening port may also be useful, for deployments using the mode ‘x’ product mode, to present a distinct “tenant-interface” API, thus isolating networking traffic for the host-level and tenant-level administrators.
2.3.2.4 Additional Ports for Redundant Interface
Administrators may configure any number of any of these interfaces. That said, the only meaningful reason to do so is in order to present distinct TLS end-entity certificates. This point has no bearing when external TLS termination is deployed.
Two cases for wanting to do this:
Additional listening ports may used to present a distinct TLS end-entity certificate to different groups of devices, such as may be necessary in order to accommodate devices manufactured using different trust anchors.
Additional listening ports may used to present a distinct TLS end-entity certificate to different groups of tenants. In particular, it is possible to use a certificate signed by a tenant-specific issuer.
2.3.3 Outbound Connections
SZTPD initiates outbound connections for the reasons discussed in this section.
2.3.3.1 Sending Email
SZTPD sends email for the following purposes:
- Activating newly created administrator accounts.
- Sending account-deactivation warnings to account administrators.
In order to deliver the email, SZTPD, or the host operating system on its behalf, will initiate an outbound SMTP/S connection to a configured SMTP server. Traditionally this is a connection to port 25, 587, or 2525.
2.3.3.2 Sending Notifications
SZTPD sends notifications for the following reasons:
- Notification of device bootstrapping activity.
- Warning of pending expirations.
- Notification of an expiration.
In order to deliver notification, SZTPD uses mutually authenticated HTTPS connection to configured URIs. The default destination port for HTTPS is port 443, but the URIs may encode alternate port number values as needed.
2.3.3.3 Verifying Device Ownership
For deployments using the mode ‘x’ product mode, SZTPD enables the host system to ensure that the serial-numbers configured by tenants are rightfully owned by the tenant.
In order to verify device ownership, SZTPD initiates a mutually authenticated HTTPS connection to the URI configured when enabling this feature.
The default destination port for HTTPS is port 443, but the URIs may encode alternate port number values as needed.
2.3.3.4 Verifying certificate paths
SZTPD may need to verify certificate paths for the following reasons:
- Verifying a remote server’s certificate.
- Verifying certificate-based client credentials.
In order to properly verify certificate paths, it is sometimes necessary for SZTPD to check the current revocation status of certificate paths. Each certificate may specify URIs for where the CRL or OCSP can be obtained and, when needed, SZTPD will initiate a connection to the URI specified in the certificate.
2.3.3.5 Accessing a remote database
When configured to use a remote database (see Persistence Selection), SZTPD will initiate connections to the remote database, specified by the URI given on the command line.
While the database is “remote” to the sztpd process it could be running on the same machine.
The remote port accessed varies by database and TLS configuration,
2.3.3.6 DNS resolution
When initiating any of the previously discussed outbound connections, the configurations for the remote host may be given as either an IP address or a domain name. When a domain name is provided, SZTPD resolves the domain name to IP addresses using the system configured DNS resolver. Depending on how the DNS resolver is configured, the host system may initiate a connection to a network-based resolver. Traditionally this is a TCP-based connection destined to port 53.
2.4 Security
SZTPD includes a host of security features for both data in motion as well as data at rest.
2.4.1 Data in Motion
All of SZTPD’s APIs are presented as mutually-authenticated HTTPS connections 8.
Two factor authentication (client certificate + password) may be configured.
Passwords, when used, may be required to have a minimal length9.
Each request sent from clients is tested against access control and a corresponding entry is recorded in the audit log.
2.4.2 Data at Rest
SZTPD hashes passwords used to authenticate clients, but otherwise leaves it to the administrator to implement database-level encryption.
Passwords are hashed when configured for both administrators and devices. For instance, a clear-text input password value, such as $0$<secret> is hashed, using SHA-256 and stored in the database as a value like $5$rounds=<rounds>$<salt>$<hash>.
However, passwords used to authenticate to a remote system (e.g., an SMTP server) are not hashed when, as the cleartext password is needed in such cases. These password may be encrypted in a future release (e.g., as a symmetric-key in the [Keystore]).
For these reasons, database-level encryption is recommended.
2.5 The sztpd Executable
When the installation completes, the executable “sztpd” is installed in your shell’s path.
To test running SZTPD and see its “help” page:
$ sztpd --helpWhich produces:
usage: sztpd [-h] [-v] [-d] [-c CACERT] [-k KEY] database-url

The SZTP Server (sztpd) implements the "bootstrap server" defined in RFC 8572.

positional arguments:
  database-url          see below for details.

optional arguments:
  -h, --help            show this help message and exit
  -v, --version         show version number and exit.
  -d, --debug           increase debug output level up to 3x (e.g., -ddd)
  -c CACERT, --cacert CACERT
                        path to trust anchor certificates used to authenticate
                        the database (see below for details).
  -k KEY, --key KEY     path to pkcs#12 used to authenticate into the database
                        (see below for details).

Exit status code: 0 on success, non-0 on error.  Error output goes to stderr.

The "cacert" argument is a filepath to a PEM file that contains one or more X.509
certificates.  The list of certificates must be ordered from the certificate of
the issuer to the database's certificate to the self-signed root certificate.

The "key" argument is a filepath to a PEM file that contains a PKCS#12, encoding
both its private key and end-entity certificate.

The "database-url" argument has the form "<dialect>:<dialect-specific-path>".
Three dialects are supported: "sqlite", "postgresql", and "mysql+pymysql".
The dialect-specific-path for each of these is described below.

For the "sqlite" dialect, dialect-specific-path follows the format "///<sqlite-path>",
where sqlite-path can be one of:

  :memory:    - an in-memory database (only useful for testing)
  <filepath>  - an OS-specific filepath to a persisted database file

Examples:

  $ sztpd sqlite:///:memory:                      (memory)
  $ sztpd sqlite:///relative/path/to/sztpd.db     (unix)
  $ sztpd sqlite:////absolute/path/to/sztpd.db    (unix)
  $ sztpd sqlite:///C:\path\to\sztpd.db           (windows)

For both the "postgresql" and "mysql+pymysql" dialects, the dialect-specific-path
follows the format "//<user>:<passwd>@<host>:<port>/<database-name>".

Examples:

  The following two examples assume the database is called "sztpd" and
  that the database server listens on the loopback address with no TLS.

  $ sztpd postgresql://user:pass@localhost:5432/sztpd
  $ sztpd mysql+pymysql://user:pass@localhost:3306/sztpd

Please see the documentation for more information.
2.5.1 Persistence Selection
SZTPD persists all data10 into the database provided on the command line (i.e., the database URL passed into the sztpd command). Varying the database URL enables use of different databases. Currently supported databases include Postgres, MariaDB, and SQLite.
2.5.1.1 In-memory Database
The in-memory database type “persists” all data in memory, which is automatically lost when the sztpd process ends. In-memory databases are fast, but demand additional process memory usage proportional to the size of the data stored.
An in-memory database is an excellent choice for development and test efforts, as it automatically disappears when the sztpd process ends. The simulator (see the Administrator’s Guide) uses the in-memory database for this reason.
An in-memory database may also have use in a production environment (e.g., in an SDN context) whereby the intent is for the SZTPD instance to be ephemeral, lasting only as long as needed to bootstrap a specific set of devices.
Use of the in-memory database type is specified by the database URL provided on the command line having the form:
sqlite:///:memory:2.5.1.2 File-based Database
The file-based database storage persists all the data into a single file located by the path-component in the database URL specified on the command line. File-based databases may be desirable in cases where persistence across power cycles is important and yet dependency on a remote RDBMS is not desirable.
The specified file may reside on a filesystem mounted from a RAID system providing resiliency against disk failures. Care should be to ensure fast and secure access to a remote system (e.g., a NAS or SAN).
The file itself may be backed-up and restored as needed to ensure disaster recovery. If the filesystem does not support taking snapshots while a system is running, it is recommended that the sztpd process is either stopped or suspended during the backup operation.
Use of the file-based database type is specified by the database URL provided on the command line having one of the following form:
sqlite:///relative/path/to/sztpd.db     (unix)
sqlite:////absolute/path/to/sztpd.db    (unix)
sqlite:///C:\path\to\sztpd.db        (windows)
2.5.1.3 RDBMS Database
The RDBMS database engine persists all the data into one of several well-known database systems (e.g., MariaDB, Postgres, Oracle, etc.). In theory, SZTPD can use any RDBMS supported by SQLAlchemy, though it is recommended to only use those that SZTPD has been tested against.
Use of an RDBMS database enables large data sets with fast-access to keyed data. Scaling of the database tier supports a variety of performance and availability targets. It is recommended to use database-level encryption to ensure to protection of the SZTPD data at rest.
Whilst the database may run as another process on the same machine, and hence the two processes could communicated with each other in a protected manner over the loopback address, it is more likely that the RDBMS is running remotely. It is recommended that the connection to a remote RDBMS is protected by transport level security (TLS), which entail both configuring the server to listen for TLS connections and configuring SZTPD to connect to the the RDBMS using TLS. Details for how to do this are provided in the RDBMS Configuration section.
Use of the RDBMS database type is specified by the database URL provided on the command line having the form:
<engine>://<user>:<passwd>@<host>:<port>/<database-name>For instance:
   postgresql://sztpd-admin:secret@db.example.com:5432/sztpd-db
   mysql+pymysql://sztpd-admin:secret@db.example.com:3306/sztpd-db
2.5.2 First-time Initialization
The first time SZTPD runs11 the server will detect that the database is uninitialized and hence prompt for:
- Contract acceptance
- Desired mode selection.
2.5.2.1 Prompting for Contract Acceptance
Example output:
<Non-Production Use Contract>

First time initialization. Please accept the license terms.

By entering "Yes" below, you agree to be bound to the terms and conditions contained on this screen with Watsen Networks.

Please enter "Yes" or "No": <SZTPD waits for input here>
Entering “Yes” allows SZTPD to proceed to prompting for the mode to run. SZTPD will exit for any other entered response, not just “No”.
2.5.2.2 Prompting for Desired Mode Selection
SZTPD can run in one of two modes12:
| Mode | Use Level | Purpose |
|---|---|---|
| 1 | Single Tenant | Ideal for single-domain deployments (e.g., enterprises). |
| x | Multi Tenant | Ideal to provide a self-service API for downstream customers. |
The mode character represents, roughly, the number or tenants. For instance, ‘1’ is for “one tenant” (i.e., you), while ‘x’ is for “many tenants” (i.e., you plus your customers).
Mode:
  1 - single-tenant
  x - multi-tenant

Mode: <SZTPD waits for input here>
Each of these modes are described in the following sections.
2.5.2.3 Mode ‘1’
Mode ‘1’ enables a multiplicity of devices to be configured, but without an additional “tenants” layer. From an API perspective, the difference, in comparison to the mode ‘x’ tree diagram, is illustrated below.
Mode ‘1’
+--rw devices
   +--rw device* [serial-number]
      +--rw serial-number     string
      +-- ... // additional device parameters here.
2.5.2.4 Mode ‘x’
Mode ‘x’ enables multi-tenancy, whereby each tenant effectively has their own Mode ‘1’ instance, with the only aspect missing being the ability to configure system-level information (e.g., networking parameters).
The host view is not only a superset of all tenant views, but it also comes with the unique ability to configure plugins, define device-types, and define an “device ownership verification” callback function13.
The difference in the APIs is illustrated below using tree diagrams (RFC 8340).
Mode ‘x’:
+--rw preferences
   +--rw device-ownership-verification!
   |  +-- ... // ownership verification parameters here
   +--rw plugins
      +--rw plugin* [name]
         +-- // plugin parameters here

+--rw device-types
  +--rw device-type* [name]
     +-- // device-type parameters here

+--rw tenants
   +--rw tenant* [name]
      +--rw name                    string
      +--rw device
         +--rw device* [serial-number]
            +--rw serial-number     string
            +-- ... // additional device parameters here.
2.5.3 Defaults
The follow sections describe defaults the freshly installed system uses.
2.5.3.1 Listening Ports
A freshly installed version will open a single port by default.
This port uses the following parameters:
- local address: 127.0.0.1
- local port: 8080
These values may be changed using environment variables:
- The default local address may be changed using the “SZTPD_DEFAULT_ADDR” environment variable.
- The default local port may be changed using the “SZTPD_DEFAULT_PORT” environment variable.
For instance:
[Note: '\' line endings per RFC 8792]

$ export SZTPD_DEFAULT_ADDR="A.B.C.D"; \
  export SZTPD_DEFAULT_PORT="9090"; \
  sztpd --key my-pkcs12.pem --cacert rdbms-cacert.pem postgresql://user:pass@localhost:5432/sztpd
2.5.3.2 Protocol
This default port presents an HTTP (without TLS) protocol over which the RESTCONF API is presented. The SZTPD server must use this port to configure the system to use TLS.
2.5.3.3 Admin Account
The default server (i.e., one that has never been configured) does not have any administrator accounts defined.
Prior to configuring an admin, no client authentication needs to be supplied.
The very first configuration write request must, at least or in addition to other changes, configure at least one administrator account and, further, this account must have the “unrestricted” access level.
2.5.4 TLS Connection to an RDBMS
2.5.4.1 Authenticating the RDBMS’s TLS Certificate
The sztpd executable takes an optional parameter --cacert to specify trust anchor certificates that SZTPD must use to authenticate the RDBMS with using TLS. SZTPD will not fallback to an unencrypted TCP connection to the RDBMS when the --cacert command line parameter is set.
2.5.4.2 Client Authentication to the RDBMS14
The sztpd executable takes an optional parameter --key that encodes a PKCS#12, containing both a private key as well as accompanying public key certificates.
The --key parameter is dependent on presence of the --cacert parameter.
Passing the key as a parameter releases SZTPD from having to determine where to store it15, while providing the installer the ability to extract the key from a secure location (e.g., TPM-protected storage).
The encryption key parameters be 44 base64 characters in length, which represents 32 random bytes, for a 256-bit key. There are many ways that can be used to generate a random key, for instance:
In which case the sztpd command line might be:
$ sztpd --key my-pkcs12.pem --cacert rdbms-cacert.pem postgresql://user:pass@localhost:5432/sztpd2.5.5 Daemonize
The sztpd executable should be executed as a daemon, gracefully starting and stopping with the host system. Many systems use “rc” scripts located in /etc/rc.d or the like for this purpose.
2.5.6 Signals
The sztpd executable responds the SIGNALS as follows:
SIGHUP: SZTPD shuts down all ports and restarts.- any other signal: SZTPD shuts down and exits.
Notably, SZTPD automatically sends itself a SIGHUP signal whenever the system-level [Transport] configuration is updated.
2.5.7 User Privileges
Unless SZTPD is asked to open a listening port below port number 1024, the sztpd does not require any special user privileges (other than be able to read any input file and write any output files), and hence it is recommended to run the sztpd executable using an unprivileged user account. Note that the sztpd executable does not itself drop user privileges.
2.5.8 Dedicated Cores
SZTPD is a single-threaded asynchronous event-driven executable. While the CPU demand has yet to be measured, the demand is not expected to be excessive.
It is ideal if the sztpd process is locked down to a core, thus avoiding delays introduced from process swapping. This means that the machine should have at least two core, at least on other being for the underlying operating system.
2.5.9 Output
The sztpd process does not produce any log files, all audit logs and bootstrapping logs are held within the database layer (see Persistence Selection).
The sztpd process itself may emit output to STDOUT and or STDERR. For instance, if an unexpected condition is encountered, a Python stack trace is generated.
It is recommended to pipe the sztpd process’s output to a file. For instance:
sztpd sqlite:///:memory: >> /var/logs/sztpd.log 2>&12.6 High-Availability
It is recommended to have a cold standby instance on the ready in another geographic location, with active database replication configured between the two sites.
By “cold” standby, what is meant is that the remote system can be booted (the operating system is running), but the sztpd process is not running. The reason why this form of “cold” standby is recommended is primarily due to the software not yet having the notion of being in a “standby” mode, but also because the sztpd process takes very little time to startup. The SZTPD process takes a couple seconds to startup on a fast CPU with a small database.].
Database-level replication varies by database. The File-based Database type entails copying a file to the remote system. Replication using an [RDBMS-based Database] entails using the replication mechanism provided by that RDBMS.
Another form of high-availability can be had through RDBMS-based database clustering, which must be configured using the clustering mechanism provided by the RDBMS.
2.7 Scaling Guidelines
Scale testing numbers have not been measured yet.
Prior deployment experience suggests low interaction rates on both the southbound and northbound interfaces, scaling proportionally to the number of bootstrapping devices. Prior deployment experience suggests that a high number of sustained interactions can be supported with SZTPD’s current implementation strategy. Adjustments to the implementation will be made as needed to meet operator requirements.
This section will be updated when scale testing numbers become available.
2.8 Upgrades
Upgrades will be distributed using pip and hence can be applied using the command:
pip install --upgrade sztpdBefore running this command, the sztpd process should be shutdown16 and a database backed up is taken.
When an upgrade is installed, there may be a need to migrate the database17, which may take some time depending on the nature of the upgrade and how much data there is in the database. If not database migration is required (typical case) then the upgrade will take only seconds to complete.
3 RDBMS Configuration
[Disclaimer: the section needs to be reviewed]
This database section provides some details to set up a persistent relational data store for the SZTPD server. This document does not cover database configuration options in full details and is not meant to replace a database server guide. This section uses the term “schema” to denote a set of database objects owned by a user account. This means a database may have more than one schemas similarly to Oracle RDBMS, where as in MySQL, a schema is referenced synonymously as a database.
Generally you will want to configure the database server to have as much RAM as possible and to fit as much data and indexes as possible in memory. We give some considerations towards an initial database set up but afterwards some database tuning, optimization, and parameter rezing would be necessary as a database grows.
3.1 MySQL | MariaDB
SZTPD is tested against MariaDB version 10.1.4 and MySQL Community edition version 8 or higher with InnoDB storage engine. This document section uses ‘MySQL’ interchangeably for MySQL on AWS EC2, AWS Aurora, AWS RDS MySQL, RDS MariaDB, MariaDB, Percona XtraDB and various MySQL forks and flavors.
3.1.1 Data at Rest Encryption
Security features available in MySQL 8 are transparent data encryption (TDE), audit plugin, undo, redo and binlog encryption, caching_sha2_password, roles and password management. In addition, OS and cloud security provided by Amazon to be implemented are VPC, IAM, and security groups. There are numerous resources on how to install MySQL/MariaDB compiled with TLS support and to configure a database instance to use encrypted connections. See:
- https://dev.mysql.com/doc/refman/8.0/en/faqs-security.html
- https://dev.mysql.com/doc/refman/8.0/en/faqs-tablespace-encryption.html
- https://mariadb.com/kb/en/data-at-rest-encryption-overview/
- https://mariadb.com/kb/en/library/innodb-encryption-overview/
- https://mariadb.com/kb/en/library/encryption-key-management/
3.1.2 Data in Transit Encryption
By default, MySQL transmits data between the server and clients without encrypting it. This is acceptable when the server and client run on the same host or in networks where security is guaranteed through other means. However, in cases where the server and client exist on separate networks or they are in a high-risk network, the lack of encryption introduces security concerns. Following details how to create configure an RDBMS instance for TLS.
Here SZTPD server acts like a MySQL client; SZTPD is going to use the client certificate to secure client-side connectivity. You must install the following files on all of your clients including the web server according to these links:
- https://mariadb.com/kb/en/library/securing-connections-for-client-and-server
- https://dev.mysql.com/doc/refman/5.5/en/using-encrypted-connections.html
- https://www.cyberciti.biz/faq/how-to-setup-mariadb-ssl-and-secure-connections-from-clients
For the purpose of this tutorial:
ssl_cert = /etc/my.cnf.d/certificates/server-cert.pem
ssl_key = /etc/my.cnf.d/certificates/server-key.pem
ssl_ca = /etc/my.cnf.d/certificates/ca.pem
See https://dev.mysql.com/doc/refman/8.0/en/faqs-tablespace-encryption.html and A.17.14 for how to change, rotate, and rekey the master encryption key.
Let’s Get Started.
For more information on how to set up and connect to a MySQL database engine, see https://dev.mysql.com/doc/mysql-getting-started/en/#mysql-getting-started-connecting.
3.1.3 Database Server Parameters
MySQL default setup for InnoDB engine contains only one tablespace called the system tablespace whose identifier is 0. More tablespace can be created indirectly using the innodb_file_per_table=ON configuration parameter. A tablespace consists of a chain of files. The size of the files does not have to be divisible by the database block size. Data files are dynamically extended, but redo log files are pre-allocated.
To support highly scalable systems, enabling the innodb_file_per_table option would make available other MySQL features such as table compression and transportable tablespace. Since InnoDB engine caches both data and index pages, initially, set the InnoDB buffer pool value to 70-80% of available memory. You or your DBA will want to change other parameters and resize the buffer based on memory requirement and usage later. For cloud database service, follow your cloud providers recommendation, such as AWS’s recommended best practices for their RDS or Aurora MySQL.
- https://docs.aws.amazon.com/en_pv/AmazonRDS/latest/UserGuide/CHAP_MariaDB.html
- https://docs.aws.amazon.com/AmazonRDS/latest/AuroraUserGuide/CHAP_AuroraOverview.html
For version MySQL 8.0 and later, the default character set and collation are UTF8MB4 and utf8mb4_0900_ai_ci. If you use an earlier release, please ensure your database character set and collation are set for UTF8MB4 and utf8mb4_0900_ai_ci.
By default, log files are not enabled in MySQL thus all errors will be shown in the syslog.(/var/log/syslog). Therefore to minimize disk I/O and read/write contention, when you enable logging, place log files on different disks from swap files, temporary tablespace files, data files, and index files. Remember to rotate log files.
$ cat /usr/local/etc/my.cnf

# This group is read both both by the client and the server
# use it for options that affect everything
[client-server]

# include all files from the config directory
!includedir /usr/local/etc/my.cnf.d
!includedir /usr/local/bin

port         = 3306
socket       = /tmp/mysql.sock
#/var/run/mysql.sock

[mysqld_safe]
nice         = 0
socket       = /tmp/mysql.sock
log_error    = /usr/local/var/log/mysql_error.log

[mysqld]
log_error    = /usr/local/var/log/mysql_error.log
log          = /usr/local/var/log/mysql.log
binlog-do-db = zero

# To enable General Query Log
#general_log_file        = /usr/local/var/log/mysql.log
#general_log             = 1

# To enable Slow Query Log
slow_query_log  = /usr/local/var/log/mysql-slow.log
long_query_time = 2
log-queries-not-using-indexes

default-storage-engine  = innodb
innodb_buffer_pool_size = 2G
innodb_file_per_table   = 1

ssl_cert = /usr/local/etc/my.cnf.d/server-cert.pem
ssl_key = /usr/local/etc/my.cnf.d/server-key.pem
ssl_ca = /usr/local/etc/my.cnf.d/ca.pem
require_secure_transport=ON


[mariadb]
plugin-load-add=file_key_management
file_key_management_filename=/mnt/usb/secret.txt
file_key_management_encryption_algorithm=AES_CTR
innodb-encrypt-tables
innodb-encrypt-log
innodb-encryption-threads = 4
plugin-load-add=file_key_management
file_key_management_filename=/mnt/usb/secret.txt
file_key_management_encryption_algorithm=AES_CTR
Start MySQL server and note that any MySQL server error log will be output to mysql_error.log file.
$ mysqldOr
$ mysql.server startRestart MySQL server after changes have been made.
$ mysql.server restartOr to stop
$ mysql stopOnce, you have a database instance running, open a MySQL client by typing the following command and enter your MySQL root password when prompted:
$ mysql -u root -p If you haven’t set a password for your MySQL root user, you can omit the -p switch.
While in the MySQL shell monitor, you can obtain the status of your connection and various databases as follows:
mysql> show databases;

+--------------------+
| Database           |
+--------------------+
| information_schema |
| mysql              |
| performance_schema |
| sys                |
+--------------------+

mysql> status;

mysql  Ver 8.0.18 for osx10.14 on x86_64 (Homebrew)
Connection id:          14
Current database:
Current user:           root@localhost
SSL:                    Not in use
Current pager:          stdout
Using outfile:          ''
Using delimiter:        ;
Server version:         8.0.18
Protocol version:       10
Connection:             Localhost via UNIX socket
Server characterset:    utf8mb4
Db     characterset:    utf8mb4
Client characterset:    utf8mb4
Conn.  characterset:    utf8mb4
UNIX socket:            /tmp/mysql.sock
Uptime:                 8 days 21 hours 17 min 57 sec
The next step is to create an administrative user login with the minimum privileges required to create other user accounts and define their privileges (CREATE USER and GRANT). For security purposes, we recommend changing MySQL root password and creating an administrative user account, as well a dedicated user account for SZTPD with minimal privileges. The next few steps entail creating a dedicated schema owner/user account and password. Here in this demonstration, we use my_user and my_pass respectively. Note that a user account in MySQL consists of user name and host name or host IP address.
mysql> show grants;
mysql> create user my_user@'%' identified by 'my_pass’ REQUIRE SSL password expire;
mysql> create user my_user@localhost identified by 'my_pass’ REQUIRE SSL password expire;
To grant access from another host, change the host name part (localhost). To create a user that can connect from any host, use the ‘%’ wildcard as a host part.
mysql> grant select on mysql.* to my_user;
mysql> grant select on mysql.* to my_user@localhost;
mysql> grant all privileges on sztpd.* to my_user@'%';
mysql> grant all privileges on sztpd.* to my_user@localhost;
Finally, reload the privileges from the grant tables in the mysql system database.
mysql> flush privileges;Commonly used privileges are:
- ALL PRIVILEGES – grants all privileges to a user account.
- CREATE – to create databases and tables.
- DROP - to drop databases and tables.
- DELETE - to delete rows from a specific table.
- INSERT - to insert rows into a specific table.
- SELECT – to read a database.
- UPDATE - to update table rows.
Now, let’s try to connect to MySQL with that newly created user:
$ mysql --ssl-mode=REQUIRED -u my_user -p -h localhostTo reset password:
mysql> set password=’new_password’;To check for user grants:
mysql> show grants for my_user@'%’;
+---------------------------------------------------+
| Grants for my_user@%                              |
+---------------------------------------------------+
| GRANT USAGE ON *.* TO `my_user`@`%`               |
| GRANT SELECT ON `mysql`.* TO `my_user`@`%`        |
| GRANT ALL PRIVILEGES ON `sztpd`.* TO `my_user`@`%`|
+---------------------------------------------------+
Verifying for TLS support:
mysql> status
Current user:   my_user@localhost
SSL:            Cipher in use is DHE-RSA-AES128-GCM-SHA256

mysql> show variables like '%ssl%';

+--------------------+-----------------------------------------+
| Variable_name      | Value                                   |
+--------------------+-----------------------------------------+
| have_openssl       | YES                                     |
| have_ssl           | YES                                     |
| ssl_ca             | /usr/local/etc/my.cnf.d/ca.pem          |
| ssl_capath         |                                         |
| ssl_cert           | /usr/local/etc/my.cnf.d/server-cert.pem |
| ssl_cipher         |                                         |
| ssl_crl            |                                         |
| ssl_crlpath        |                                         |
| ssl_fips_mode      | OFF                                     |
| ssl_key            | /usr/local/etc/my.cnf.d/server-key.pem  |
+--------------------+-----------------------------------------+

mysql> show global variables like 'tls_version'';

+---------------+-------------------------------+
| Variable_name | Value                         |
+---------------+-------------------------------+
| tls_version   | TLSv1,TLSv1.1,TLSv1.2,TLSv1.3 |
+---------------+-------------------------------+
To verify your user account has been created and grants are given successfully, exit and login back in MySQL Shell as the new user. MySQL will prompt for a password.
$ mysql> quit
$ mysql -u my_user -p
Install MySQL connector
$ pip install mysql-connectorIn another OS shell, start the SZTPD server for the first time. This will populate the schema/database ‘sztpd’ with tables and indexes. If you run the SZTPD server again, it will skip schema creation because sztpd schema already exists.
Finally, verify that your sztpd schema was installed successfully by switch to sztpd database schema and list the tables:
mysql> show databases;
mysql> use sztpd;
mysql> show tables;
+-----------------+
| Tables_in_sztpd |
+-----------------+
| aa              |
| al              |
| bb              |
| bb2             |
| bbi             |
| cc              |
| cc2             |
| co              |
| cr              |
| dbl             |
| drm             |
| drmmm           |
| kaa             |
| kaacc           |
| kss             |
| obi             |
| oo              |
| pdvv            |
| pdvvmm          |
| pnww            |
| rb              |
| singletons      |
| sp              |
| sp2             |
| tc              |
| tcc             |
| tle             |
| tlehrccc        |
| tlehrccc2       |
+-----------------+
3.2 PostgreSQL
We installed and tested PostgresSQL release 11.4 or later. Once the installation is completed, start up a PostgresSQL instance, hosted locally on port 5432. The server will be run out of the directory /usr/local/var/postgres.
By default, a Postgres installation has three databases defined template0, template1 and postgres. template0 and template1 are skeleton databases that are or can be used by the CREATE DATABASE command. postgres is the default database you will connect to before you have created any other databases. Once you have created another database you will want to switch to it in order to create tables and insert data. Often, when working with servers that manage multiple databases, you’ll find the need to jump between databases frequently. This can be done with the connect meta-command or its shortcut c.
In the event that the postgres command is not found, you can locate it by issuing the locate bin/postgres command:
$ locate bin/postgres
/usr/lib/postgresql/11.4/bin/postgres
Now with the direct path to the postgres utility, you can call it with the -V flag:
$ /usr/lib/postgresql/11.4/bin/postgres -VTo view the client version, again simply pass the -V flag to the psql client utility command:
psql -VAfter verifying the PostgreSQL software, you can configure a different database server/data directory with a name of your choice - this example uses [Data Dirctory] as follow:
$ initdb [Data Directory] -E utf8Start manually with the database directory in /usr/local/var/postgres:
$ pg_ctl -D /usr/local/var/postgres startStop manually:
$ pg_ctl -D /usr/local/var/postgres stopStop manually with launchd, which starts postgresql now and restarts at login:
$ brew services restart postgresqlCheck for error messages in the server.log and verify that postgres is in /var/lib/pgsql and a running process with “ps -ef | grep postgres” (its on port 5432).
3.2.1 Postgres Encryption Options
- https://www.postgresql.org/docs/current/encryption-options.html
3.2.2 Enabling TLS communication between PostgreSQL database and SZTPD server
To enable TLS 1.2 with server certificate validation, edit Postgres server configuration parameters in the postgresql.conf file, which specifies server behavior with regards to auditing, authentication, encryption, and other behaviors. The postgresql.conf file usually resides in the data directory under your installation:
password_encryption = scram-sha-256     # md5 prior to 10 or scram-sha-256 post version 10

# - SSL -
ssl = on
ssl_ca_file = ''
ssl_cert_file = 'server.crt'
ssl_crl_file = ''
ssl_key_file = 'server.key'
ssl_ciphers = 'TLSv1.2:!aNULL' #'HIGH:MEDIUM:+3DES' or TLSv1.3
               or a list of ciphers but TLSv1.2 is a safe bet
ssl_prefer_server_ciphers = on
pg_ctl reload
If you have a Postgres release 11.4, set ssl_ciphers to TLSv1.2.
PostgreSQL release 12 contains two new server settings (ssl_min_protocol_version and ssl_max_protocol_version) that are are used to control the oldest (minimum) and newest (maximum) version of the SSL and TLS protocol family that the server will accept. Set these to TLSv1.2 and TLSv1.3 respectively.
Client authentication is controlled by a configuration file, which is named pg_hba.conf and is stored in the database data directory. Make sure tcp localhost connections are enabled in pg_hba.conf and modify your pg_hba.conf file to use scram-sha-256 algorithm. For more information, see
- https://www.postgresql.org/docs/12/auth-pg-hba-conf.html TYPE DATABASE USER ADDRESS METHOD
local all all scram-sha-256Procure the Certificate Authority (CA) signed certificate for the PostgreSQL database from the system administrator of your organization. Ensure that the certificate is in x509 format. For example, postgres.crt. Save the procured certificate file in the following locations:
SZTPD Server:
- https://info.crunchydata.com/blog/how-to-upgrade-postgresql-passwords-to-scram
- https://github.com/MagicStack/asyncpg/blob/master/asyncpg/protocol/scram.pyx#L263
To start a PostgresSQL shell client connecting to the default Postgres database, type:
 $ psql postgres
 psql (12)
 Type "help" for help.
You can start the server from a specific directory. To do this use the command and substitute in for the specified values:
pg_ctl -D [Data Directory] -l [Log file] startThe “Data Directory” refers to the directory that was just initialized. The “Log file” is a file that will record server events for later analysis. Generally log files are formatted to contain the date in the file name (e.g. “2018-05-27.log” or “myData-logfile-2018-05-27.log”) and should be stored outside of the database that they are logging so as to avoid unnecessary risks.
The server will only start if the port is free. If the default server is running it must first be stopped using command:
pg_ctl -D /usr/local/var/postgres stopOnce started, the database instance can be connected using an open source admin and development tool such as pgAdmin or simply a PostgreSQL shell:
$ psql —help
Connection options:
  -h, --host=HOSTNAME      database server host or socket directory (default: "local socket")
  -p, --port=PORT          database server port (default: "5432")
  -U, --username=USERNAME  database user name (default: "kristen")
  -w, --no-password        never prompt for password
  -W, --password           force password prompt (should happen automatically)

$ psql postgres
Once inside PostgresSQL shell, create a user account with a password and permission to create a database, as follow:
postgres=> CREATE USER my_sztpd WITH LOGIN ENCRYPTED PASSWORD 'my_pass’ CREATEDB;For more details, see https://www.postgresql.org/docs/9.1/sql-createrole.html
Exit out and login back in to verify that the user was created successfully
postgres=>exit
$ psql sztpd -U my_sztpd
postgres=conninfo
You are connected to database "sztpd" as user "my_sztpd" via socket in "/tmp" at port "5432".
Then you can start the SZTPD server, which creates a schema and populate seed data for the tables.
While the SZTPD server is running and waiting for client connections, you will want to verify that the schema and tables have been created successfully.
sztpd=> dn
  List of schemas
  Name  |  Owner
--------+----------
 public | kristen
 sztpd  | my_user
4 Working with AWS Relational Database Service (RDS)
4.1 RDS Using Encryption
RDS allows you to protect your data by using encryption in transit and at rest. For encryption in transit, SSL is supported by RDS. RDS will create a certificate and install it on an instance when it is provisioned. You can download the public key from Amazon and use it to encrypt your connection in order to secure the traffic between the application server and the database on AWS. Encryption at rest is also supported by every database engine run by RDS and is applied not only to the instance storage, but also to read replicas, automated backups, and snapshots. Encryption at rest is handled by AWS Key Management Service and is enabled during the provisioning of the database using the Amazon RDS console at the time you create an instance of the database. See: - https://docs.aws.amazon.com/AmazonRDS/latest/UserGuide/Overview.Encryption.html
When the instance is up and running, it will request a data key (each database will have its own unique key) from KMS and will use it to encrypt the data. Encryption is also important when it comes to compliance, so make sure you enable it when setting up your database.
Changing Your RDS Encryption Key
Keep in mind, you can update your RDS encryption key by using a workaround utilizing your snapshots. The process to clone an existing encrypted Amazon RDS DB instance to a new encrypted RDS DB instance with a different encryption key is fairly simple. Note that you will not be able to change the existing encryption key of an already encrypted RDS DB instance. You must use the copy snapshot process to change the encryption key and then restore the snapshot to a new encrypted instance with the new key.
- http://docs.aws.amazon.com/AmazonRDS/latest/UserGuide/UsingWithRDS.IAMDBAuth.html#UsingWithRDS.IAMDBAuth.Connecting
- https://docs.aws.amazon.com/AmazonRDS/latest/UserGuide/UsingWithRDS.IAMDBAuth.IAMPolicy.html
4.2 IAM Roles
You need to assign an IAM role which gives your client, in this case SZTPD, the right to connect to RDS. SZTPD server Could be a lambda function, or an EC2 instance, or something else. Whatever it is, it has an ARN and it must be allowed the action rds-db:connect.URL quoting connection string. There may be an issue with RDS credentials. You may have to URL quote the password if it contains characters which are not allowed in a URL.
5 Aurora
Amazon has marketed Aurora to be fully compatible with MySQL and PostgresSQL, allowing any application to work without any modification. For more information, see: - https://aws.amazon.com/about-aws/whats-new/2015/12/amazon-aurora-now-supports-encryption-at-rest/
And doubly so when using an in-memory database, though doing so in a production environment doesn’t make sense.↩︎
A profile of each kind of bootstrapping device is needed but, in general, device boot times may be an order of magnitude more time than any networking activity, thus the speed of the networking interface may be unimportant in the end.↩︎
Some more so than others. For instance, OpenBSD is pretty secure out of the box.↩︎
Even when external TLS termination is deployed, it still seems better to dedicate a port for each interface from both performance and monitoring perspectives.↩︎
When “HTTPS” is configured, SZTPD asserts that each port must have a unique private key and hence certificate. When “HTTP” is configured how the TLS certificates are managed is outside of SZTPD’s scope.↩︎
For instance, using a private PKI.↩︎
For instance, using a common public PKI.↩︎
There is an ability to offload the TLS termination to a device fronting it (e.g., a firewall). In either case, the traffic to the client endpoints is always protected by TLS.↩︎
Note that long passwords, such as might better known as passphrases, are recommended. Setting the minimum length to, e.g., 25 characters encourages that best practice.↩︎
SZTPD does not use any configuration files of any sort.↩︎
Really each time it runs against an uninitialized database, in case the database is ever reinitialized.↩︎
Warning: As per the Release Notes, the ‘product mode’ concept may disappear in the future.↩︎
The “device ownership verification” callback function is used to ensure that the devices configured by tenants are rightfully owned by the tenants.↩︎
Not yet implemented.↩︎
Note that the key cannot be stored in the database since it is needed in order to establish a connection to the database.↩︎
For instance, by sending the
SIGTERMsignal to thesztpdprocess. Alternatively, if using a process manager, via a command such asstop sztpd.↩︎Only occurring only on major SZTPD product version boundaries↩︎